


How to Get Retinal Care Without Dilation
- 2 days ago
- 11 min read
In a rural eye clinic, a patient leans into a camera while the technician says the first image may be enough without any drops. The room goes still. One flash, then another. For a few seconds, the whole visit rests on whether retinal imaging can capture a clear view through a natural pupil.
You want the scan, not the blur that can follow dilation. That is a fair request. But the practical goal is not to avoid drops at any cost. It is to get the least invasive test that still gives your doctor a usable diagnostic image. If you approach the visit that way, you will book more intelligently, travel less blindly, and know when dilation is simply the safer fallback.
Prerequisites and tools before you book retinal care
What to have ready before you call
Set this up like a medical test, not a routine vision screen. Before you call, collect your referral letter if you have one, your current glasses, a medication list, your insurance or Medicare details, and any prior eye reports. If you have diabetes, cataracts, age-related macular degeneration, glaucoma concerns, or recent symptoms such as flashes, floaters, or distorted central vision, write that down in plain language.
A short written summary works well. I usually tell patients to prepare three lines: why the scan is being requested, what eye history matters, and whether they are trying to avoid dilation because of driving, work, or previous bad reactions.
What details your eye doctor should already know
Retinal imaging is a diagnostic test that creates high-quality digital images of the inner, back surface of the eye. That area includes the retina and structures such as the macula and optic nerve. It is often used during comprehensive eye care visits to help monitor known disease or investigate a new concern.
That means your doctor should already know the clinical reason for the scan, whether there are previous images to compare, and how often imaging has been recommended. If you were told to return in six months, say so when you book. If this is your first visit after cataract surgery or a diabetic eye review requested by your GP, say that too.
When a no-dilation request may not be enough
Ask for a non-dilated scan first, but do not assume that request settles the matter. Small pupils, a hazy cornea, dry eyes, or cataracts can all reduce image quality. So can the actual problem being assessed. If your doctor needs a very wide view of the peripheral retina, or a closer look at a suspicious finding, a clear image may not be possible without drops.
The clinic should tell you this before you travel, especially if you are coming from a regional town and have a long drive home.
Treat this as a diagnostic appointment: the more precise your reason for the visit, the easier it is to request the right method.
Step 1: Confirm why you need retinal care
Screening versus monitoring
Start with the question the visit is meant to answer. A general screening image is different from close monitoring of known retinal disease. Retinal images can help diagnose diabetic retinopathy, glaucoma, and macular degeneration. They can also document whether a condition is stable, worsening, or responding to treatment.
If this is a first-time check, non-dilated imaging is often easier to attempt. If you already have a known retinal problem, the standard may be higher because the clinician is looking for change, not just a broad overview.
Ask what condition the doctor is looking for
The retina is not one small spot. Your scan may need to show the macula in the centre, the optic nerve where the nerve fibres leave the eye, or the more peripheral retina further out. Ask directly: “What are you trying to assess today?” A patient with diabetes may need assessment of diabetic retinopathy. A patient with blurred central vision may need the macula assessed. A patient with glaucoma concerns may need careful attention to the optic nerve.
That single question usually changes the rest of the booking conversation.
Ask directly whether drops are required
Do not ask, “Can you do imaging without dilation?” Ask, “For my reason for the visit, can you try without drops first, and when would dilation still be required?” That wording is better. It ties comfort to image quality and clinical need, rather than turning the discussion into a yes-or-no preference exercise.
No-dilation is not just about comfort; it is about whether the clinic can still get a clear image for the problem being evaluated.
Step 2: Ask which retinal imaging method the clinic uses
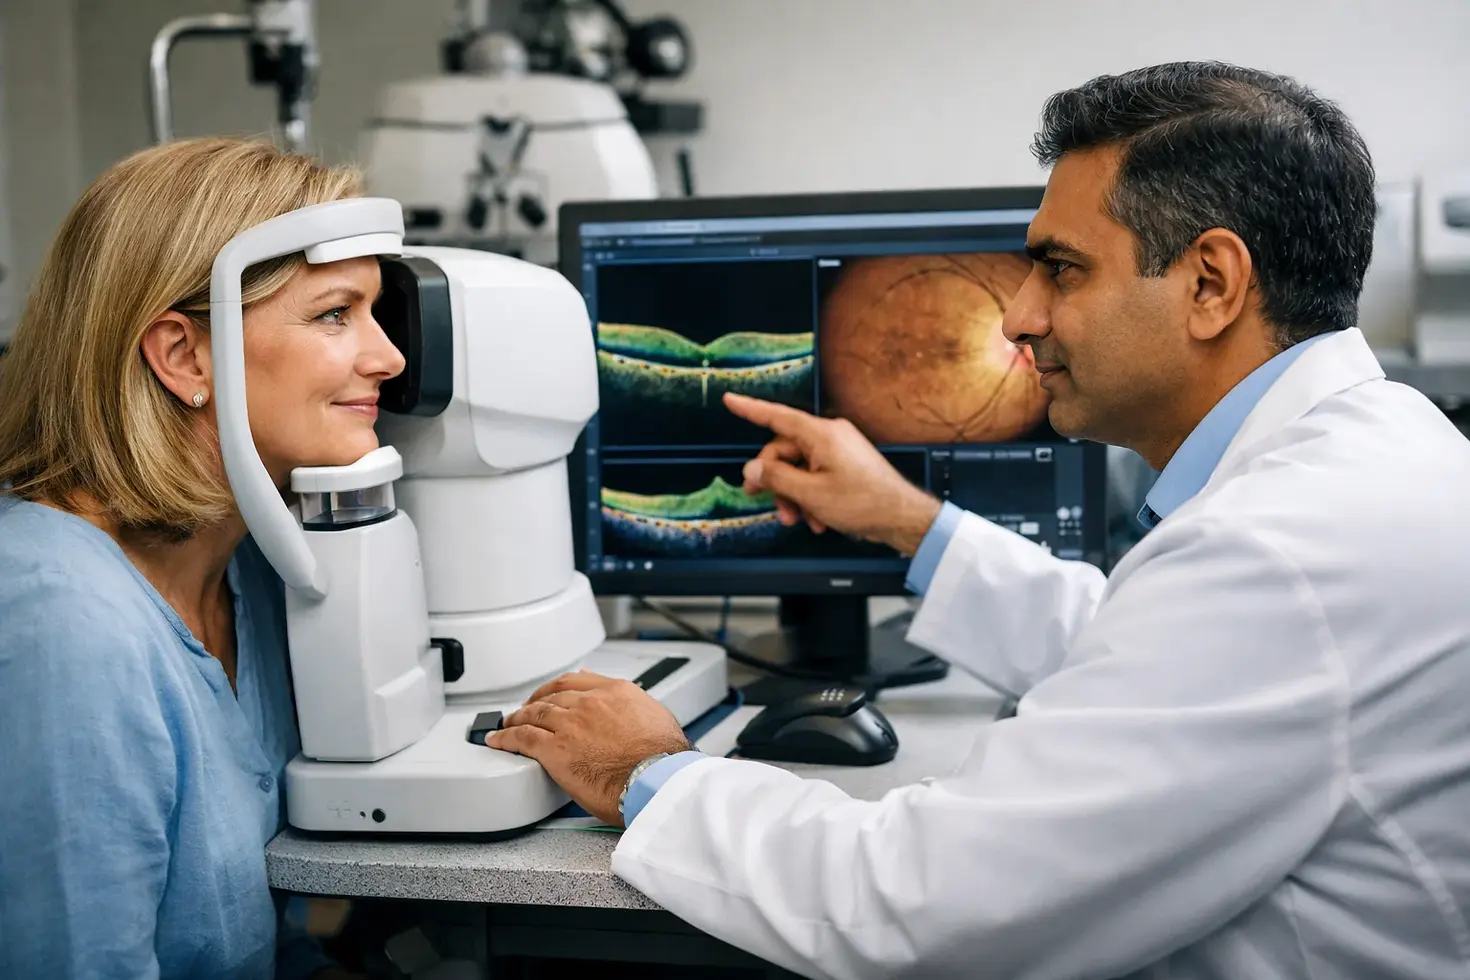
Ask what machine or imaging style they use
Different clinics use different equipment. Some rely on a standard retinal camera. Some offer wider-field imaging that can show more of the retina without moving to another test. Some combine photography with OCT, a scan that shows the retinal layers in cross-section. The American Academy of Ophthalmology has published guidance on choosing the right retinal imaging method, and that matters because one device does not answer every question.
You do not need to sound technical. Ask, “What machine do you use, and is it suitable for my condition?” That is enough.
Check whether cataracts or other eye issues could affect image quality
This is where many bookings go wrong. A clinic may offer retinal imaging, yet your eye may still be hard to photograph without drops. Cataracts are a common reason. So are small pupils, dry ocular surfaces, or difficulty keeping steady fixation. If you already know your vision is cloudy from a cataract, say that on the call. It can save an unnecessary trip.
A patient with early cataracts may still get an excellent non-dilated image. A patient with denser lens opacity may not. That distinction is practical, not theoretical.
Confirm whether a second test might still be needed
Even when a clinic can obtain a non-dilated image, a second test may still be required. The photograph may document the general appearance of the back of the eye, while another scan may be needed to clarify swelling, fluid, bleeding, or a membrane on the macula. Ask this upfront so you understand whether the first scan is the whole assessment or just the opening step.
A clinic can provide retinal care and still not have the right setup for your specific eye disease or lens opacity.
Step 3: Find a provider who can coordinate the right appointment locally
Call nearby eye clinics first
For rural and regional patients, access is often the real barrier. Start local. Call optometry clinics, ophthalmology rooms, hospital eye departments, and medical practices that handle diabetic or retina follow-up. If you are searching in the Hills district, Canberra, Liverpool, Randwick, or a surrounding regional community, ask whether the appointment can be arranged onsite before you commit to a long drive.
Use a direct script: “I need a retinal review, I would prefer it without dilation if appropriate, and I need to know whether you can arrange that at your clinic.” Clear questions get clear answers.
Ask whether the service is done onsite or by referral
Some clinics assess patients but send imaging elsewhere. Others provide consultation and review at the same visit. That difference matters if you live two or three hours away. Ask whether the assessment, interpretation, and follow-up discussion all happen in one place.
If you are calling a specialist service in New South Wales or the ACT, including a retina-focused practice such as Dr Rahul Dubey’s rooms, ask whether your appointment can be coordinated at that location or through another site. That will tell you whether your booking solves the problem or only starts the referral chain.
Use hospital, specialty, or network pathways if needed
If the nearest clinic cannot provide the assessment you need, do not stop there. Many health systems now let patients find care, schedule appointments, and review available services online before they ring the clinic. Your GP, local optometrist, diabetes educator, or ophthalmology receptionist may also know which regional centre has the right expertise.
Call the nearest clinic.
Ask whether the appointment is onsite.
If not, ask exactly where they refer.
Confirm travel distance, appointment wait time, and whether the referral includes the clinical question.
The nearest clinic is not always the best clinic if it cannot handle the exact assessment you need.
Step 4: Check benefits, authorization, and out-of-pocket cost
Ask whether the visit is billed as medical care
This part catches many people off guard. Retinal imaging is a diagnostic test. It is not always treated as a routine vision photo, and it may not sit neatly inside the glasses-and-frames part of your cover. Some vision plans leave a gap here, especially when the imaging is ordered to assess disease rather than routine sight correction.
Ask the receptionist, “Will this be billed as medical eye care, and what item or service description should I confirm with my fund?” That sentence can save weeks of billing confusion.
Use a benefits portal or cost estimate if you have one
Many insurers and large health systems now let patients review benefits, get medical cost estimates, and track expenses online. Use those tools before the appointment. If no estimate is available, request one by phone or email. You want the likely out-of-pocket figure before the visit is performed, not after the invoice lands.
Confirm whether prior approval is needed
Prior approval is not universal, but it is worth checking whenever a visit is ordered for a specific disease process. If you are travelling from a regional area, get that sorted before you leave home. You do not want to arrive with the right paperwork for the clinic and the wrong paperwork for your cover.
Get the cost answer before the appointment, not after the bill arrives.
Step 5: Prepare for the appointment so the visit goes smoothly
Bring prior records, medication details, and your glasses
Preparation improves interpretation. Bring old retinal photographs, OCT reports if you have them, letters from your GP or optometrist, and a current medication list. Include eye drops. Bring the glasses you actually use, not the pair left in the glove box since 2023. If your vision has recently changed, that detail may help the clinician interpret what is seen.
Retinal care is often used in follow-up visits. Comparison is powerful. A small change on today’s image means more when it is viewed beside last year’s scan.
Complete any pre-visit forms ahead of time
Many clinics send questionnaires before the visit. Fill them out. Pre-visit forms reduce reception delays and give the doctor a better starting point. If you have diabetes, prior retinal tears, inflammatory eye disease, cataracts, or recent surgery, document that clearly. A rushed verbal history at the front desk is often incomplete.
List symptoms and when they started.
Note prior eye operations or injections.
Record any difficulty with bright lights or dilation in the past.
Plan transportation in case dilation still happens
This is the step people skip. If there is any chance you may need dilation as a backup, arrange a ride or at least a backup driver. I have seen patients assume they will “probably be fine” for a 90-kilometre drive home, only to find that the images were too limited and drops became necessary after all.
If there is any chance of dilation, do not assume you can safely drive yourself afterward.
Step 6: At the appointment, ask for the non-dilated scan first
Follow the positioning instructions carefully
The scan itself is brief, but technique matters. Rest your chin fully, keep your forehead against the bar, blink when told, then hold still for the capture. A slightly misaligned head or a half-blink can turn a usable image into a repeat attempt. If you wear multifocal glasses, the staff may ask you to remove them for the scan.
Good positioning is not a trivial detail. It can be the difference between keeping the visit simple and moving to dilation.
Ask what happens if the first image is blurry
Say this at the start: “If the first image is unclear, please tell me whether another attempt, a different machine, or dilation would be the next step.” That lets you understand the pathway before you are halfway through it. Some clinics can repeat the scan after a short rest. Some can switch to a wider-field device. Some will recommend drops immediately if the clinical question is urgent.
Know when dilation becomes the fallback
Retinal imaging produces digital images of the back of the eye and helps monitor conditions over time. But if the retina cannot be seen clearly enough, the goal changes. At that point, avoiding drops is no longer the priority. Getting a reliable picture is.
Ask for the non-dilated scan first.
See whether the image answers the clinical question.
If it does not, accept the fallback that gives the doctor a safe, useful view.
If the first image is unreadable, the goal changes from avoiding drops to getting a usable picture.
Step 7: Understand the result and what happens next
Ask what the images showed today
Do not leave with a vague “looks okay” if the visit can support a clearer answer. Retinal images can reveal conditions that, without treatment, may lead to vision loss. Ask whether the scan was normal, abnormal, or limited. If something was unclear, ask exactly what was unclear. Was it the macula, the optic nerve, or the far edge of the retina?
Ask how often follow-up is needed
Your provider decides how often retinal care should be repeated. That interval depends on the reason for the visit. A stable finding may be reviewed annually. A changing problem may need earlier follow-up. Write the interval down before you leave, especially if you manage multiple appointments across GP, optometry, and ophthalmology care.
Ask what would trigger a repeat visit with dilation
This question is especially useful if today’s assessment was successful without drops. Ask what symptoms or findings would make the next visit different. New floaters, a curtain-like shadow, sudden blur, worsening diabetic control, or a poorer image through a progressing cataract may all change the plan.
Do not leave without knowing whether the assessment was normal, what was unclear, and when the next check should happen.
Common mistakes to avoid
Assuming every vision plan covers the visit
This is one of the most common errors. Because retinal imaging can sound like a routine eye photo, patients often assume standard vision cover applies automatically. It may not. When the visit is performed for medical reasons, coverage and billing can differ from a routine refractive visit. Check first. Always.
Not confirming the clinic has the right equipment
A clinic may genuinely offer retinal care and still not offer the method best suited to your situation. That is not a criticism of the clinic. It is simply a reality of equipment, staffing, and case mix. If you have cataracts, prior retinal surgery, diabetic eye disease, or a need for wide-field assessment, confirm the setup before you travel from a rural area.
Not asking whether dilation could still be required
This is the expectation mistake. Patients sometimes hear “we do non-dilated imaging” and assume drops are off the table. That is not what the phrase means. It means the clinic may be able to start without drops. If image quality is poor or the clinical concern is too serious for a limited view, dilation remains part of safe care.
The biggest mistake is treating retinal care like a standard eye-screening add-on instead of a medical appointment with access and billing questions.
Non-dilated retinal imaging is possible when you ask early, book the right clinic, and accept that drops may still be needed if the image is not good enough.
That approach reduces surprises and gives your doctor a better chance of seeing the retina, macula, and optic nerve clearly enough to act. Before your next retinal appointment, which question matters most to you — image quality, travel, or cost?
Comments