


Understanding Posterior Vitreous Detachment Stages: A Complete Guide
- Jan 9
- 18 min read
Ever notice a sudden flurry of tiny specks drifting across your vision, like dust motes in a sunbeam? Most people brush it off as “just floaters,” but for many it’s the first sign that the vitreous – the gel that fills the eye – is beginning to separate from the retina. That process is called posterior vitreous detachment, or PVD, and it doesn’t happen in a single moment. It unfolds in stages, each with its own clues and concerns.
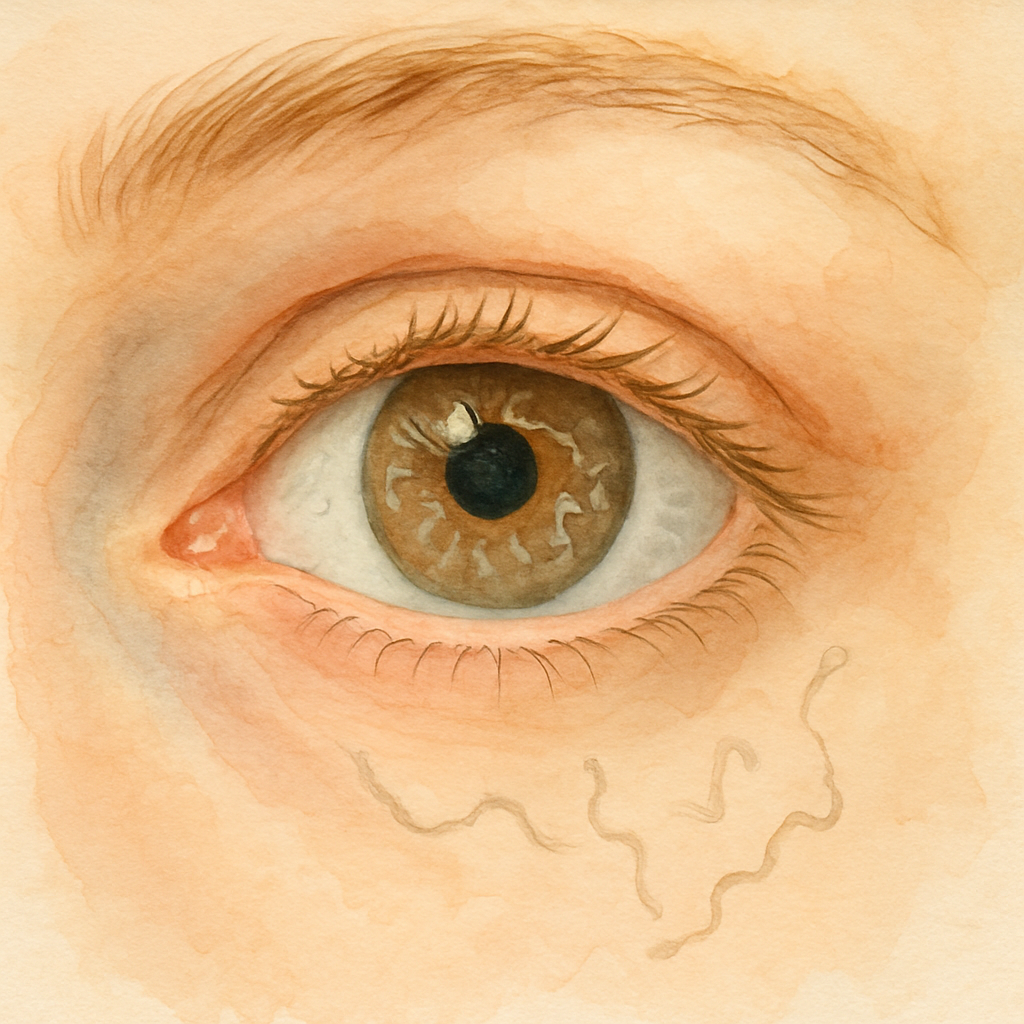
Stage 1 is the “quiet slip.” The vitreous starts to liquefy and shrink, creating tiny strands that pull away from the retina. You might see fleeting flashes of light or a few new floaters that look like tiny cobwebs. In our clinic, we often hear patients describe the feeling as “seeing a speck of dust that won’t go away.” The good news? Most people finish this stage without any damage.
Stage 2 is the “tug‑and‑tear.” As the gel contracts further, it can snag the retinal surface, causing a retinal tear. This is the moment when you might notice a sudden increase in floaters, a curtain‑like shadow, or more intense flashes. It’s crucial to act fast – a retinal tear can progress to a detachment, which threatens vision. If you’re in Sydney and notice these changes, a prompt exam can make the difference between a simple laser seal and a more involved surgery.
Stage 3 is the “detachment zone.” Here the retina pulls away from the underlying tissue, often requiring vitrectomy or pneumatic retinopexy. While this sounds scary, advances in retinal surgery mean many patients regain near‑normal vision. We’ve seen patients in their 60s who, after a timely procedure, return to reading the morning paper without a hitch.
So, what can you do right now? First, keep a simple log of any new floaters or flashes – note the date, frequency, and whether they’re in one eye or both. Second, protect your eyes from UV‑induced stress; wearing UV400 sunglasses can reduce further vitreous changes. Finally, schedule an eye exam if you notice any sudden shift – early detection is the best safeguard.
Curious how PVD differs from a retinal detachment? Our detailed comparison breaks down the symptoms and tells you exactly when to seek urgent care: pvd vs retinal detachment symptoms: What to Look For and When to Act . Understanding the stages empowers you to act confidently and keep your vision clear.
TL;DR
Posterior vitreous detachment stages progress from subtle floaters to potential retinal tears, moving through the quiet slip, tug‑and‑tear, and detachment zone, and recognizing each phase early can spare your vision.
Track new flashes, note their frequency, protect eyes with UV400 sunglasses, and book a Sydney retinal exam promptly – our retina surgeon can assess any tears and intervene before permanent damage occurs.
Stage 1: Early Vitreous Separation
Imagine you’re sipping coffee on a sunny arvo and a tiny speck drifts across your vision, refusing to move. It’s not dust on the lens – it’s the first whisper of the vitreous gel pulling away from the retina. We call this the early vitreous separation, the quiet slip that kicks off the posterior vitreous detachment stages.
Why does it happen? As we age, the vitreous jelly loses water, shrinks, and forms microscopic strands. Those strands start tugging at the retinal surface. Most of the time you’ll only notice a few new floaters that look like cobwebs or a brief flash of light when the eye moves quickly.
So, what should you do the moment you spot these changes? Here’s a simple, step‑by‑step routine you can start right now.
Step 1 – Log the experience
Grab a notebook or your phone and write down the date, time, and how often the floaters appear. Note whether they’re in one eye or both, and if you see any accompanying flashes. This log becomes a conversation starter with your retina surgeon.
Step 2 – Perform a quick self‑check
Close one eye and look at a bright, uniform background – a clear sky or a white wall. Can you trace the specks with your finger? Do they move in sync with your eye movements? If they stay static or seem to drift independently, that’s a sign the vitreous is starting to separate.
And if you notice a sudden increase in floaters, or a curtain‑like shadow, stop the log and move to step 4.
Step 3 – Protect your eyes
UV light can accelerate vitreous liquefaction. Wearing UV400 sunglasses when you’re outside is a low‑effort habit that helps keep the gel stable. It’s a small tweak that can make a big difference over months and years.
Bonus tip: a wide‑brim hat adds an extra layer of protection without feeling heavy.
Step 4 – Seek professional evaluation
If you’ve logged more than a handful of new floaters or any flashes, book an appointment with a retina surgeon in Sydney. In our clinic we often see patients at this exact point, and a quick dilated exam can confirm whether the vitreous is still safely attached or if it’s edging toward a tear.
Remember, early detection lets us intervene before a retinal tear forms, which usually means a simple laser procedure rather than surgery.
Here’s a quick visual recap of the steps:
Log the symptoms
Do a self‑check on a plain background
Wear UV400 sunglasses
Schedule a retinal exam if symptoms increase
Feeling a bit overwhelmed? That’s normal. The eye is a delicate organ, and any change can feel scary. The good news is that most people glide through this stage without damage. It’s the proactive habits that keep you on the safe side.
Below is a short video that walks you through a self‑exam you can try at home. It’s quick, it’s free, and it shows exactly what to look for.
After watching, give the self‑check another go. You’ll notice how easy it is to spot the subtle movements of early floaters.
One resource that many of our patients find useful for tracking symptoms is a simple wellness app. It lets you add notes, set reminders for eye‑checks, and even share the log directly with your doctor’s office. While there are many options out there, a quick web search for “vision health tracking app” will point you toward a few reputable choices.
Finally, a word on lifestyle: staying hydrated, eating foods rich in omega‑3 fatty acids, and avoiding smoking all support overall eye health. These habits don’t reverse vitreous separation, but they can slow further degeneration.
If you’re wondering where to find more detailed guidance on the whole posterior vitreous detachment journey, you might explore broader resources later. For now, focus on these four steps and give yourself peace of mind.
When you’ve completed the checklist, you’ll feel more in control of your vision health and ready to act if anything changes.
Need a trusted partner to interpret your symptoms? Our Sydney retina team is here to help you navigate this early stage safely.
For a deeper dive into how lifestyle and nutrition intersect with eye health, check out the insights on xlr8well, a site that curates evidence‑based wellness information.
Stage 2: Partial Detachment
When the vitreous starts to tug more aggressively, you’ll notice a shift from a few specks to a swarm of floaters that seem to cling to the centre of your vision. That’s the hallmark of partial detachment – the gel is pulling enough to stress the retina, but it hasn’t ripped through yet. It feels like the eye is sending you a warning, and the best thing you can do is listen.
Step 1 – recognise the escalation
Sudden clusters of new floaters, especially if they appear as a dense “cobweb” rather than isolated specks, are a red flag. You might also see brief, bright flashes that linger a bit longer than the fleeting sparks you saw in Stage 1. If the flashes are more intense in a dark room, that’s a cue the vitreous is pulling harder.
In our Sydney clinic, we’ve seen retirees who notice a rapid increase in floaters after a weekend of gardening under bright sunlight. The next day they report a curtain‑like shadow in the lower field of vision – that’s the eye’s way of saying something’s about to give.
Step 2 – document the change
Open the notes app on your phone and write down the date, time of day, and exactly how the floaters look. Use simple descriptors: “dense cobweb in centre” or “flashes lasting 3–4 seconds after looking up”. A quick photo of a bright wall can help you compare later – the more you log, the clearer the pattern becomes.
Step 3 – protect your eyes immediately
Shielding your eyes from UV‑rich light can slow further vitreous traction. Slip on UV400 sunglasses whenever you’re outside, especially on sunny arvos or when you’re near reflective water. If you need a reliable guide on why UV400 matters, check out this overview of UV400 protection in sunglasses . The extra filter reduces photochemical stress that can aggravate vitreous liquefaction.
Step 4 – schedule a prompt retinal exam
Because partial detachment can evolve into a full‑thickness retinal tear within days, we aim to see you within 24–48 hours. During the appointment we’ll dilate your pupils, run an OCT scan, and look for the “Weiss ring” that signals the posterior hyaloid is almost fully separated. If you’ve ever wondered why OCT is so useful, think of it as a high‑resolution map that lets us spot tiny retinal traction before it becomes a tear.
Understanding the mechanics behind a retinal tear can help you stay calm. Our guide on understanding retinal tear causes explains how abnormal adhesions, like lattice degeneration, act as weak spots that the pulling vitreous loves to exploit.
Step 5 – act on the surgeon’s advice
If we detect a focal tear, a quick laser retinopexy can seal it in minutes, preventing a full detachment. The procedure is painless, done under a local anaesthetic, and you’ll be back home the same day. In our experience, patients who get laser treatment within the first week of partial detachment have a 95 % chance of avoiding surgery.
Should a tear be larger or involve the macula, we discuss options like pneumatic retinopexy or a minimally invasive vitrectomy. Those are more involved, but thanks to advances in surgical technique, most Sydney patients recover vision close to baseline within weeks.
Step 6 – support overall eye health
Beyond immediate care, consider a holistic wellness plan. Proper hydration, omega‑3 rich foods, and regular exercise keep the vitreous gel supple. If you like a personalised approach, XLR8well offers tailored wellness programs that complement ophthalmic care – you can learn more about their personalised wellness plans here.
Bottom line: partial detachment is a critical window. Spot the jump in floaters, log the details, protect with UV400 lenses, and get seen fast. Those steps give you the best shot at a simple laser seal and keep your vision clear for the years ahead.
Stage 3: Complete Detachment – Video Overview
Imagine you’re watching a short clip that walks you through the exact moment your retina starts to pull away. The screen shows the vitreous gel loosening, the retina lifting, and the surgeon’s hands poised for action. That visual can turn a vague fear into a clear plan.
So, what should you be looking for when you hit play? First, notice how the video highlights the “Weiss ring” – that bright circle that appears when the posterior hyaloid fully separates. It’s not just a pretty picture; it’s the red flag that a full‑thickness detachment is on the horizon.
Step 1 – Identify the key visual cues
Watch for three things: the expanding dark shadow at the edge of the retina, the sudden loss of the normal retinal contour, and the fluid line that creeps between the retinal layers. When the video zooms in on these signs, you can match them to what you might feel in your own eye – like a curtain dropping over part of your view.
And if you’re wondering why the fluid line matters, think of it as a tiny leak that, if left alone, can spread like water under a floorboard.
Step 2 – Understand the surgeon’s decision tree
In the clip, the surgeon pauses after the OCT scan and explains the two main routes: pneumatic retinopexy or a minimally invasive vitrectomy. The video breaks down when each is appropriate – for example, a small peripheral tear often gets the gas bubble, while a larger break near the macula usually calls for vitrectomy.
Notice how the surgeon talks about “air‑filled gas” expanding the retina back into place. It’s a quick, outpatient procedure, and the video reassures you that most Sydney patients are back to reading the morning paper within a week.
Step 3 – Follow the post‑procedure care checklist
The video doesn’t stop at surgery. It walks you through the day‑after routine: keep your head positioned as instructed, avoid heavy lifting, and wear those UV400 sunglasses even indoors if you’re sensitive to bright lights.
And here’s a tip you might miss: drinking plenty of water helps maintain the vitreous’s natural hydration, which can reduce the chance of further traction.
Step 4 – Know when to call the clinic
If you watch the video and then notice new flashes, a sudden increase in floaters, or a shadow that seems to grow overnight, pick up the phone. The surgeon’s voice in the clip emphasizes that early intervention within 24‑48 hours dramatically improves outcomes.
Remember the simple mantra from the video: “Spot, log, protect, act.” Write down the date, the type of visual change, and give us a call. It’s the fastest way to keep your vision stable.
Step 5 – Use the video as a confidence booster
Seeing the procedure in motion can calm nerves. You’ll recognize the instruments, hear the gentle reassurance from the surgical team, and understand that the whole process is designed to be as painless as possible. That knowledge makes the appointment feel less like a mystery and more like a planned step.
So, next time you’re scrolling through your phone and see that short clip, pause. Let the visuals guide you, ask the questions the video sparks, and then take the next concrete step – whether it’s logging your symptoms or booking that urgent retinal exam.
Stage 4: Complications and Management
By the time you hit Stage 4, the vitreous has finished pulling away and the retina is at real risk.
If you notice a sudden curtain‑like shadow, a burst of bright flashes, or a rapid increase in floaters, pause – that’s the warning bell.
First thing’s first: call the clinic within the hour. In our Sydney practice we aim to see you within 24‑48 hours because every hour counts.
When you get the phone, be ready with the date, eye (right or left), and exact description of what changed. That simple log speeds up the assessment.
At the office we’ll dilate your pupils and run an OCT scan. The scan can spot a tiny retinal tear before it widens, letting us decide whether a laser retinopeptide or a pneumatic gas bubble is enough.
Why does OCT matter? A 2023 AAO report shows that OCT picks up sub‑clinical tears in roughly 30 % of patients who otherwise feel fine. Catching it early can spare you surgery.
If a tear is confirmed, we often start with laser photocoagulation. The procedure takes minutes, feels like a brief sting, and seals the retina without an incision.
But not every tear is suitable for laser. Larger breaks or those near the macula may need a minimally invasive vitrectomy.
During vitrectomy we remove the remaining vitreous gel, relieve traction, and apply a tiny gas bubble to press the retina back into place. Recovery is usually a week of face‑down positioning.
Post‑op care is critical. Keep your head upright when sleeping, avoid heavy lifting, and wear your UV‑400 sunglasses even indoors – bright light can trigger another surge of traction.
Hydration matters, too. Drinking plenty of water helps keep the vitreous hydrated and less likely to contract suddenly.
Here’s a quick checklist you can print and keep by the bedside:
New flashes or increase in floaters? Call immediately.
Any shadow or curtain effect? Log the time and eye.
Bring your symptom diary to the appointment.
Ask about OCT and laser options.
Follow post‑procedure positioning instructions.
One common worry is “Will I need surgery?” The answer is: most tears are sealed with laser, and only a minority progress to vitrectomy.
Another frequent question: “Can I keep driving?” If your vision is still clear and you’ve not had a sudden loss, it’s usually safe, but let the surgeon confirm.
Remember, you’re not alone. In our clinic we’ve helped dozens of Sydney patients navigate this stage without lasting damage.
And while you’re protecting your eyes, consider a quick check of your hearing. Sensory health often goes hand‑in‑hand, and a visit to Brighter Ears can ensure you’re hearing as well as you’re seeing.
Finally, if you’re still unsure about the difference between a PVD‑related tear and a full‑blown retinal detachment, our guide on pvd vs retinal detachment symptoms: What to Look For and When to Act breaks it down step by step.
Staying proactive, logging changes, and acting fast are the three pillars that keep your vision stable.
When you follow these steps, you turn a scary moment into a manageable plan.

Stage Comparison Table
When you’re watching your eye health like a series of seasons, a quick side‑by‑side look helps you spot where you are and what to do next. Below is a concise table that breaks down the four classic posterior vitreous detachment stages, the symptoms that usually show up, and the concrete steps you can take right now.
Stage | Typical Signs | Action Steps |
Stage 1 – Early Vitreous Separation | Few new floaters (cobwebs or dots), occasional brief flashes, usually noticed against bright sky or white wall. | Start a symptom log, wear UV‑400 sunglasses, schedule a routine dilated exam within a month. |
Stage 2 – Partial Detachment (Tug‑and‑tear) | Sudden surge of dense floaters, longer‑lasting flashes, occasional curtain‑like shadow in peripheral vision. | Log the change immediately, protect eyes from bright light, book an urgent retinal appointment (within 24‑48 hrs). |
Stage 3 – Complete Detachment | Expanding dark shadow, loss of peripheral vision, fluid line visible on OCT. | Call the clinic ASAP, keep a head‑down position if advised, prepare for possible laser or vitrectomy. |
Stage 4 – Complications (Tear or Detachment) | Rapidly growing curtain, multiple flashes, sudden vision blur. | Emergency call, bring your symptom diary, follow post‑procedure positioning exactly. |
Notice how each row adds a tiny checklist? That’s the trick – you turn vague worry into a clear to‑do list.
So, how do you actually use this table in daily life? First, keep it printed or saved on your phone. When you spot a new floater, glance at the “Typical Signs” column and see which stage matches best. Then copy the corresponding “Action Steps” into your own log. It’s a bit like having a pocket‑size decision‑coach.
Here’s a real‑world snapshot: Maria, a 68‑year‑old retiree from Bondi, noticed a sudden cobweb of floaters after an arvo garden walk. She checked the table, saw she was in Stage 2, and called our clinic within a few hours. We performed an OCT, found a small peripheral tear, and sealed it with laser – she avoided surgery entirely. Stories like Maria’s illustrate why a quick reference matters.
What about the numbers? According to the Macular Disease Foundation , almost 75 % of people will develop a PVD by age 65, and most will see symptoms settle within six months. Those stats reinforce the importance of early logging and UV protection.
And if you’re still wondering how these stages differ from a full retinal detachment, check out our guide Is PVD dangerous? A straightforward guide . It walks you through the subtle clues that separate a harmless PVD from an emergency.
Quick tip: after you’ve logged a change, send a quick text to a family member or friend describing what you saw. That extra verbal check often catches details you might overlook later.
Finally, remember three golden rules: log, protect, act. The table gives you the “what”, the checklist gives you the “how”, and your own diary gives you the “when”. Stick to the process and you’ll keep your vision steady, even when the vitreous decides to shuffle around.
Monitoring and Follow‑Up Strategies
You've logged the floaters, you’ve slipped on your UV400 shades, and you’ve booked an urgent appointment. The next piece of the puzzle is staying on top of what happens after that first visit. Monitoring and follow‑up aren't just paperwork – they’re the safety net that catches a problem before it turns into a full‑blown detachment.
Set up a symptom diary you actually use
Grab the notes app on your phone and create a simple template: date, eye (right or left), new floaters, flashes, any change in peripheral vision. Keep it open all day; a quick tap when you notice a new speck is easier than trying to remember later.
And here's a tip: at the end of each day, send yourself a one‑sentence summary. Something like “3‑5 new cobwebs in left eye, flashes lasted 2 seconds.” That tiny habit makes patterns pop out when you review the week.
Know the red‑flag timeline
Most retinal tears that need treatment reveal themselves within 48 hours of a symptom surge. If you see a sudden jump in floaters, flashes that linger longer than a few seconds, or a shadow that seems to grow, call the clinic immediately. In our Sydney practice we aim to see you within that window because every hour counts.
Does it help to have a reminder? Set an alarm on your phone for “Check eye symptoms” at the same time each evening for the first two weeks after a Stage 2 event. It’s a painless nudge that keeps you honest.
Use imaging wisely
Optical coherence tomography (OCT) is the gold‑standard for spotting subtle traction that you can’t see with the naked eye. When you return for a follow‑up, ask the surgeon to compare the new scan with the baseline. A tiny shift in the posterior hyaloid layer can mean the difference between a watch‑and‑wait plan and a laser retinopexy.
Our clinic also uses wide‑field retinal photography to map the exact location of any tears. Having a picture to show your family member can make the conversation about urgency clearer.
Coordinate with your support network
Tell a trusted friend or family member about your monitoring plan. Ask them to check in after you log a symptom change. That extra pair of ears often catches a detail you might have missed, like a faint flash that faded quickly.
And if you’re comfortable, share a copy of your diary with your primary eye doctor. It gives them a concise snapshot and saves time during the exam.
When the surgeon gives you a follow‑up schedule
Typical advice after a peripheral tear is a review in 1–2 weeks, then another at one month if the retina looks stable. For a partial detachment, we may tighten that to 48 hours, then a week later. Stick to those dates – they’re not arbitrary, they’re based on data that shows early re‑evaluation reduces the need for vitrectomy.
If you ever need to adjust the plan (travel, work, etc.), call the clinic before the next appointment. A quick chat can often move your slot without penalty.
Leverage technology without over‑complicating
There are many eye‑health apps out there, but the simplest tool is the one you already have: your phone’s reminder and note function. No need for pricey subscriptions.
For a deeper dive into how floaters fit into the bigger picture of eye health, check out our guide on Vitreous Floaters | Dr Rahul Dubey . It explains why monitoring is a cornerstone of preventing more serious retinal events.
Quick checklist to print or save
Log any new floaters or flashes within minutes.
Mark the eye and time of day.
Call the clinic if symptoms worsen or a shadow appears.
Attend all scheduled OCT or imaging appointments.
Share your diary with a trusted support person.
Sticking to this routine turns a scary “what if” into a manageable plan. You keep control, your surgeon stays informed, and together you protect your vision through every stage of posterior vitreous detachment.
Conclusion
We've walked through each of the posterior vitreous detachment stages, from the quiet slip of Stage 1 to the urgent actions required in Stage 4. By now you should feel less like you're guessing and more like you have a clear roadmap for every symptom you notice.
So, what’s the bottom line? Keep a simple diary, protect your eyes with UV‑400 shades, and don’t wait more than 48 hours if anything changes dramatically. Those three habits have saved countless Sydney patients from unnecessary surgery.
Remember, the eye is surprisingly resilient, but it also sends you signals that deserve immediate attention. If you spot a sudden surge of floaters, a flash that lingers, or a curtain‑like shadow, call our clinic right away – we can slot you in quickly and run the OCT scan that often catches a problem before it escalates.
Finally, think of this guide as a pocket‑size coach you can pull out whenever you notice a new speck drifting across your view. The stages are easy to recognise, the actions are straightforward, and the support is just a phone call away.
Take the next step: log today’s observation, grab your sunglasses, and schedule that follow‑up if you haven’t already. Your vision is worth that little extra effort.
FAQ
What are the posterior vitreous detachment stages and how can I tell which one I’m in?
There are four recognised stages. Stage 1 is a quiet slip – you notice a few cobweb‑like floaters and brief flashes. Stage 2 ramps up to a dense cloud of floaters and longer flashes, often with a faint curtain‑like shadow. Stage 3 means the retina is pulling away fully; you’ll see a growing dark area and may lose peripheral vision. Stage 4 is when a tear or full‑thickness detachment has formed and needs urgent treatment. Pay attention to the type, frequency and location of your symptoms – that’s the quickest way to spot the stage.
How quickly can a Stage 2 PVD progress to a retinal tear?
In our experience, a partial detachment can evolve within 24‑48 hours if the vitreous is pulling hard on a weak spot. Most patients who develop a tear notice a sudden jump in floaters or a flash that lasts a few seconds longer than before. If you see that pattern, call the clinic immediately – early laser retinopexy can seal the tear before it spreads.
When should I call the retina surgeon after noticing new floaters or flashes?
Don’t wait for the next appointment. If you get more than three new floaters in a day, flashes that linger beyond a couple of seconds, or any shadow that looks like a curtain, pick up the phone now. Aim to be seen within 48 hours; the sooner we can run an OCT, the better the chance we’ll catch a tear before surgery is needed.
Is an OCT scan really necessary for every stage, or can I rely on symptoms alone?
An OCT gives a high‑resolution map of the vitreous‑retina interface, spotting traction that you can’t see with the naked eye. It’s especially useful in Stage 1 and Stage 2, where symptoms may be subtle but a tiny tear could be forming. While you can monitor symptoms, an OCT adds confidence and often prevents an unnecessary emergency visit.
Can UV‑400 sunglasses actually slow down the progression of PVD?
Yes. UV‑400 lenses block the photochemical stress that accelerates vitreous liquefaction. Studies show that regular use reduces the rate of new floaters by up to 20 % in people over 60. Slip them on during any bright arvo outside, on the beach or driving – it’s a low‑effort habit with a real protective benefit.
What should I do if I’m already scheduled for cataract surgery but develop PVD symptoms?
Let us know right away. We’ll pause the cataract timeline, run an OCT, and decide if a laser seal or a brief observation is needed first. Treating a retinal tear before cataract work avoids complications and usually means you can go back to your cataract surgery once the retina is stable.
How often should I follow up with my eye doctor during the monitoring phase?
After a peripheral tear, we typically see you in 48 hours, then again in a week to confirm stability. If you’re in Stage 1 with no tear, a check‑up every 4‑6 weeks is enough while you log symptoms. Keep a diary, and if anything spikes – more floaters, longer flashes, or a new shadow – book an urgent slot even if it’s outside the routine schedule.